
How to Clean a Portable Blender

How to Clean a Portable Blender is important for daily use. A portable blender touches fruit, milk, and protein powder. Leftover food stays inside the cup and blade area. This creates bad smell and bacteria growth. It also changes drink taste and reduces machine life.
Proper cleaning keeps the cup safe and fresh. It also helps the motor work better over time. In this guide, you will learn a 5-minute daily clean and a 15-minute deep clean for odor removal.
Quick Daily Cleaning: How to Clean a Portable Blender
This section shows a fast daily method. It works for users who use the blender once or more each day. It keeps smell low and keeps taste clean.
Turn off and separate parts
Turn off the portable blender and remove the cup from the base. If the blade part detaches, remove it carefully.
Rinse right away
Rinse the cup under running water for about 30 seconds. Use a soft brush to clean inside the blade area.
Use warm water and soap
Fill the cup with warm water and add one drop of mild dish soap. Run a short self-clean cycle for 10–20 seconds if the blender supports it. Pour out the water and rinse again with clean water.
Wipe and air dry
Use a clean cloth to wipe the cup and sealing ring. Place all parts upside down and let them air dry.
Quick Tips
- Use warm water under 50°C
- Do not wash the motor base with water
- Use a small toothbrush to clean seal gaps
Deep Cleaning and Odor Removal: How to Clean a Portable Blender
I once opened my portable blender after a busy week. I saw leftover milk and protein mix inside the cup. The smell was strong and sour. I also noticed green stains from spinach stuck near the blade. I decided to do a deep clean.
This section shows a deep method for How to Clean a Portable Blender after heavy use.It also helps users who blend milk, greens, or protein powder. Bad smell often comes from food left inside the cup and blade area.
Method A: White Vinegar Soak
Mix white vinegar and warm water in a 1:2 ratio. Fill the cup and let it soak for 10–15 minutes. Run a 30-second self-clean cycle if the blender supports it. Rinse with clean water after that.
Do not soak metal parts for a long time. Long soaking can affect some stainless steel surfaces.
Method B: Baking Soda Wash
Add 1–2 teaspoons of baking soda into warm water. Fill the cup and mix it well. Let it sit for 15–20 minutes.
Run a short blend or self-clean cycle for 20–30 seconds. Rinse the cup with clean water. This method removes oil stains and strong odor.
Method C: Lemon and Salt Scrub
Cut one lemon and add a small amount of salt inside the cup. Add a little warm water. Blend for 10–15 seconds.
This method removes light odor and gives a fresh smell. It also helps clean light stains on the surface.
Method D: Cleaning Tablets
Drop one cleaning tablet into warm water. Let it dissolve in the cup. Run a self-clean cycle for 1–2 minutes.
Use this method once or twice per week. It works well for deep odor control.
Comparison Table
| Method | Main Benefit | Best Use Case | Material Risk | Frequency |
|---|---|---|---|---|
| White Vinegar | Strong odor removal | Milk, protein residue | Low risk for plastic, caution for metal | Weekly |
| Baking Soda | Oil and stain removal | Heavy use, sticky residue | Low risk for all materials | Weekly |
| Lemon + Salt | Fresh smell, light cleaning | Light odor | Very safe | Occasional |
| Cleaning Tablets | Deep sanitation | Long neglect, strong smell | Very safe | 1–2 times/week |
Disassembly Cleaning and Hidden Parts: How to Clean a Portable Blender
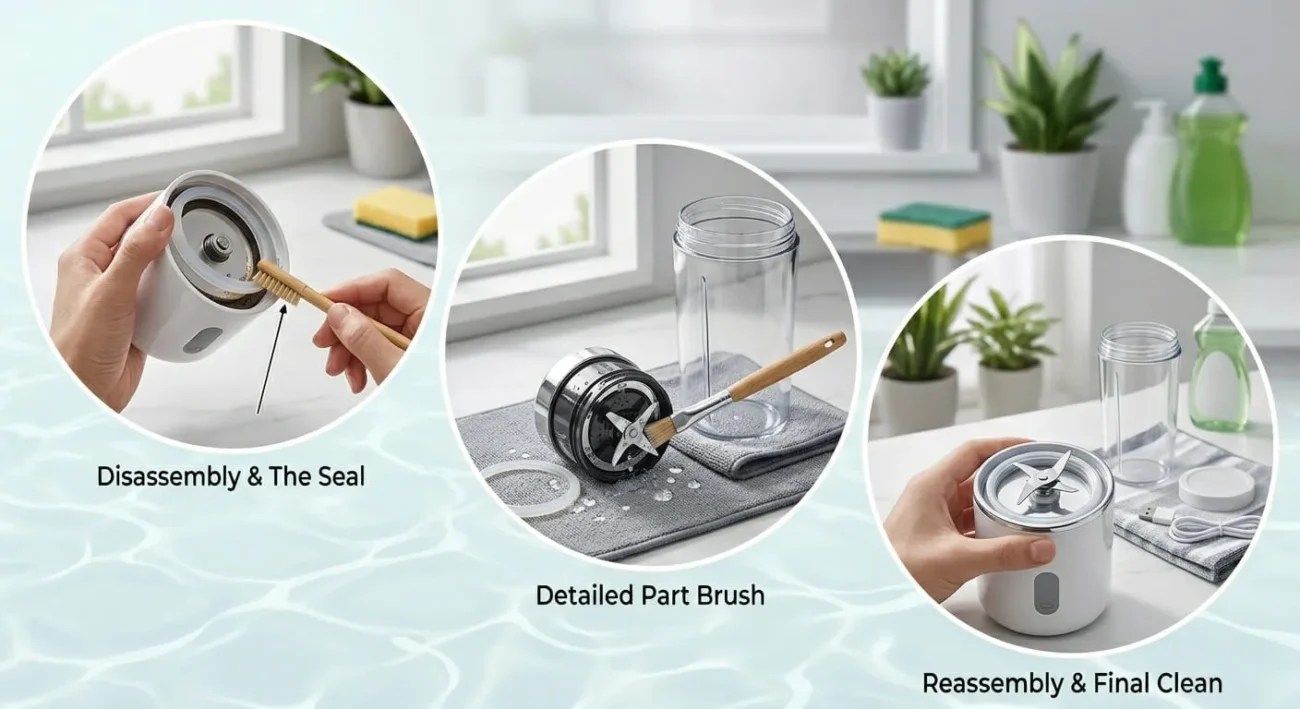
Some dirt stays in hidden parts of a portable blender. Regular rinsing does not remove it. I once saw a slow drop in blending power after two weeks. I later found dried fruit stuck under the seal ring. This part explains a hidden step in How to Clean a Portable Blender that most users ignore.
Parts You Should Remove and Clean
Clean each part after use or deep cleaning cycle:
- Blade unit
- Seal ring
- Lid
- Blending cup
- Filter mesh (if your model has one)
Part Cleaning Cheat Sheet
| Part | Why Clean It | Cleaning Method | Frequency |
|---|---|---|---|
| Blade unit | Food blocks blades | Rinse + soft brush + mild soap | After each use |
| Seal ring | Traps smell and residue | Remove and scrub with small brush | 2–3 times per week |
| Lid | Holds liquid residue | Wash with warm soapy water | After each use |
| Blending cup | Main odor source | Rinse or deep clean method | After each use |
| Filter mesh | Gets clogged easily | Brush under running water | Weekly |
Disassembly and Reassembly Steps
Follow this order for safe cleaning:
- Turn off the blender
- Remove the cup from the base
- Take out the blade unit carefully
- Remove the seal ring and lid
- Wash all parts with warm water and mild soap
- Dry all parts fully
- Reassemble in reverse order
Simple rule: dry all parts before assembly.
Important Cleaning Note
The seal ring and blade base trap food easily. Dirt stays in small gaps. I once used a toothpick to clean dried banana under the seal ring. The smell disappeared after cleaning.
Check these areas once a week. Use a soft brush or toothpick for narrow gaps.
Pro Tips
- Clean the blender right after use. This stops smell from forming.
- Use a small brush for seal gaps. A toothbrush also works well.
- Let all parts dry fully before storage. Moisture causes odor.
- Run a short water blend cycle after sticky drinks like smoothies.
- Store the blender with the lid open to reduce smell.
Common Mistakes
- Do not wash the motor base with water. Water can damage the motor.
- Do not ignore the seal ring. It is the main place for hidden dirt.
- Do not reassemble wet parts. Wet parts cause bad smell.
- Do not use strong chemicals. They can damage plastic and rubber parts.
- Do not skip weekly deep cleaning if you use milk or protein powder.
Troubleshooting Checklist
1. Leakage
- Check seal ring position
- Clean dirt under seal ring
- Replace seal ring if damaged
2. Loud noise
- Check blade area for stuck food
- Clean base connection point
- Tighten cup properly
3. Slow blending speed
- Clean blade unit fully
- Remove residue inside cup
- Fully charge battery before use
BlendCupDaily One-Touch Cleaning Explained: How to Clean a Portable Blender Quickly and Safely
BlendCupDaily one-touch cleaning uses a simple system. The blender creates a water swirl inside the cup. The blade spins at low speed. Warm water and a small drop of dish soap help remove fruit residue and juice stains. Most cleaning finishes in 30–60 seconds.
The main value is simple use. You add water and press one button. The system runs a cleaning cycle. This reduces cleaning time. It also reduces direct contact with food waste.
4-Step Quick Cleaning Process
1. Prepare (10–20 seconds)
Remove large food pieces from the cup first. This step helps the cleaning cycle work better. Add half a cup of warm water into the cup. Add one drop of mild dish soap. Warm water helps loosen light residue.
2. Start Cleaning (30–60 seconds)
Press the clean button to start the cycle. The blender runs an automatic wash process. Water moves in a fast swirl inside the cup. The blade rotates at low speed to help remove stuck food. This step cleans most light residue in under one minute.
3. Drain and Rinse (10–20 seconds)
Pour out the used water after the cycle ends. Rinse the cup with clean water one time. This step removes soap and leftover particles. Make sure no foam stays inside the cup.
4. Dry (20–60 seconds)
Use a clean cloth to wipe small gaps and edges. Place all parts upside down to air dry. Air drying helps prevent odor and moisture build-up. Do not close the lid before the parts are fully dry.
Usage Limits, Maintenance, and When to Do Manual Cleaning: How to Clean a Portable Blender
Not-safe-to-wash parts
Do not wash the motor base, charging contacts, or any electrical interfaces with water. Do not rinse or soak these parts. Water can damage the device and reduce product safety. Always keep these areas dry during cleaning.
Best use cases for one-touch cleaning
One-touch cleaning works best for light and soft residue. It removes common drink waste in a short cycle.
- Soft fruit pulp
- Fruit juice
- Light fruit residue
When not to use one-touch cleaning
One-touch cleaning does not work well for thick, sticky, or dry residue. These materials need manual cleaning first.
- High-fat foods like nut butter
- Dried protein or milk stains
- Other hard, stuck residue
For these cases, remove leftover food first. Then soak the cup with warm water before deep cleaning.
Safety and maintenance tips
Clean the seal ring once a week. Use warm water and a soft brush for cleaning. Replace the seal ring if it cracks or keeps a bad smell.
Check the blade base every 1–2 weeks. This step is important for users who often make milk or protein drinks. Remove any residue trapped in small gaps.
When to trigger deep cleaning
Start deep cleaning if you notice any of the following:
- Persistent bad smell after washing
- Oily surface inside the cup
- Dried food around the blade area
In these cases, use a baking soda soak or white vinegar soak. Then clean the parts with a soft brush.
Material and Brand Care Tips: How to Clean a Portable Blender
Different materials affect How to Clean a Portable Blender in daily use.I once bought two portable blenders at the same time. One had a plastic cup, and the other had a stainless steel body. After a few weeks, I noticed different cleaning results. The plastic cup showed light scratches from hot water. The stainless steel one stayed stable, but I still needed to avoid long soaking. This made me realize that material and brand design affect how you clean each device.
Different portable blender brands also give different cleaning rules. Some models support higher temperatures. Some only allow quick rinse and wipe. This section explains how to clean each type safely and avoid damage.
Plastic (BPA-free), Glass, and Stainless Steel Care
Different materials need different cleaning care. This helps protect your portable blender and extend its life.
- BPA-free plastic cups: Use warm water and mild soap. Do not use water above 50°C. Do not use strong chemicals like bleach. High heat can deform plastic.
- Glass cups: Use normal warm water and soft cleaning tools. Avoid hard drops or strong impact. Glass can break easily.
- Stainless steel parts: Use mild soap and soft sponge. Do not soak for a long time. Long soaking can affect surface quality in some models.
Motor Base and Electrical Safety
The motor base is the most sensitive part of a portable blender.
- Do not soak or rinse the base in water
- Keep charging ports dry at all times
- Clean only with a slightly damp cloth
- Check your model’s IP rating before cleaning (most portable blenders are splash-resistant only, not waterproof)
Water contact with the base can cause device failure or safety risks.
Brand and Model Quick Reference
Different brands may have small cleaning differences. Always check the user manual first.
- BlendJet portable blender cleaning steps
- PopBab portable blender care guide
- BlendCupDaily cleaning instructions
These brand pages often provide model-specific cleaning tips and spare part guidance. Internal links can also help users find correct cleaning instructions faster.
Conclusion
In this guide on How to Clean a Portable Blender, we show a simple system for daily rinse, deep cleaning, disassembly care, one-touch cleaning, and material-safe maintenance, so users can keep their blender clean, safe, and long-lasting with minimal effort.
Choose BlendCupDaily for a smarter routine. Our BlendCupDaily portable blender with one-touch cleaning lets you finish cleaning in under one minute with just water and a single press, making daily use faster, easier, and more convenient.